In this post, we explain how to get started with Snowpack Dev Server with the good look at what makes Snowpack special.
The idea is to have a working NodeJS project with Snowpack. You can then build on top of it and add features incrementally.
But before that, time for some basic explanations to help you get started.
1 – What is Snowpack?
Snowpack is a frontend build tool.
Yes – another one of those things that makes you write a bunch of configurations that you barely understand. And despite all the hardship, these build tools seem to be slow as a snail while building your ever-growing application.
All of this might change if Snowpack’s claims are true. As per Snowpack, they are designed for the modern web. What this essentially means is that they leverage Javascript native module system. This makes Snowpack faster than other build tools such as Webpack and Parcel.
2 – Snowpack vs Webpack – Unbundled Development
Why is Snowpack fast?
To know the answer to this question, let us first understand how traditional build tools such as Webpack work.
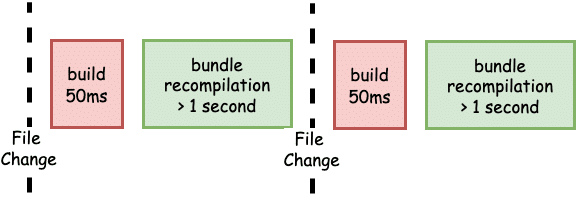
When we create an application and make changes to any particular file in our source code, Webpack needs to rebuild and rebundle entire chunks of application. Every single time.
Basically, this means that there is a lag between saving your code and seeing the changes reflected in the browser.
See below illustration depicting the building and bundling process for Webpack.

If you are interested to see Webpack in action, check out this post about building a Svelte application with Webpack.
Snowpack follows a different approach known as unbundled development.
But what is unbundled development?
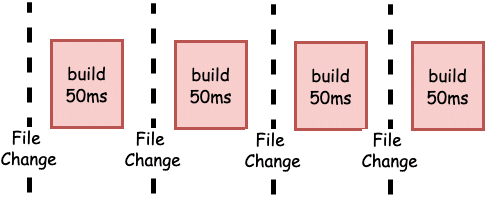
Unbundled development is the concept of shipping individual files to the browser while developing. Basically, each file is built only once. After building, it is placed in a cache and is served from the cache. Only when the file changes, Snowpack will rebuild that particular file.
However, after rebuilding the modified file, Snowpack does not rebundle the entire application. Only the modified files are loaded into the browser individually. The dependencies are managed by ESM import and export syntax.
See below illustration for Snowpack unbundled development approach:

Unbundled development approach has advantages when compared with the traditional approach. Basically, Snowpack builds every file individually. Also, every file is cached indefinitely. In other words, the dev server will never build a file more than once. The browser will also never download a file more than once unless there is a change in the file.
3 – Install Snowpack with NodeJS Project
We now understand the concept behind Snowpack.
Let us now see it in action. To get started, we will create an empty directory for our first Snowpack project.
$ mkdir snowpack-nodejs-project
$ cd snowpack-nodejs-project
We will initialize our project by creating a simple package.json file.
$ npm init -yWe can now install Snowpack using npm.
$ npm install --save-dev snowpackNote that Snowpack is a development dependency. Hence, we use the flag –save-dev.
4 – Snowpack Dev Server
It’s time to create a simple HTML file. This will allow us to run the Snowpack dev server and see some output.
We will place the below index.html file in our project directory.
<!DOCTYPE html>
<html lang="en">
<head>
    <meta charset="UTF-8">
    <meta http-equiv="X-UA-Compatible" content="IE=edge">
    <meta name="viewport" content="width=device-width, initial-scale=1.0">
    <title>Snowpack Demo App</title>
</head>
<body>
    <h1>Hello, World from Snowpack</h1>
</body>
</html>
We will also update the package.json file with the start script.
{
  "name": "snowpack-nodejs-project",
  "version": "1.0.0",
  "description": "",
  "main": "index.js",
  "scripts": {
    "start": "snowpack dev"
  },
  "keywords": [],
  "author": "",
  "license": "ISC",
  "devDependencies": {
    "snowpack": "^3.8.8"
  }
}
The development server builds a file only when a request for that file comes from the browser. Basically, this allows Snowpack to start up almost instantly. It can also scale to larger projects without slowing down. This is because only the requested file is built.
We can start the dev server by using npm run start. Snowpack will automatically open the site in the browser on http://localhost:8080.
If we make changes to the index.html file, the changes are immediately applied when we save the file.
5 – How Snowpack Processes Javascript?
Javascript’s ES Module syntax is the backbone for Snowpack’s unbundled approach. Let us see it in action.
We will create a simple javascript file that exports a greeting() function.
export function greeting() {
    console.log('Hello, World from Snowpack');
}
Then, we create an index.js file. This file basically imports our module file using ESM syntax.
import { greeting } from './greeting.js';

greeting();
Snowpack finds the files via the index.html. So we can add the index.js file in the <body> tag.
<!DOCTYPE html>
<html lang="en">
<head>
    <meta charset="UTF-8">
    <meta http-equiv="X-UA-Compatible" content="IE=edge">
    <meta name="viewport" content="width=device-width, initial-scale=1.0">
    <title>Snowpack Demo App</title>
</head>
<body>
    <h1>Hello, World from Snowpack</h1>
    <script type="module" src="/index.js"></script>
</body>
</html>
If we run the application now, we will see the greeting message in the console. If there is a change in the module, Snowpack rebuilds the single module without rebuilding the rest of the application.
You can also check the logs to find that Snowpack detects particular file changes and also maintains a counter for the number of times a file has changed.
[12:45:49] [snowpack] File changed: greeting.js (x2)This approach of building only files that have changed makes Snowpack faster than other module bundlers out there.
Conclusion
With this, we have successfully learnt how to get started with Snowpack dev server.
The important takeaway from this Snowpack tutorial is not the actual code but the concept of unbundled development. This concept makes Snowpack stand out from the rest of the bundlers.
You can find the code for this post on Github.
If you have any comments or queries, please feel free to mention in the comments section below.
0 Comments