Quill editor is an extremely powerful and free open-source WYSIWYG editor. You can read more about it here. In this post, we will learn how to use React Quill with NextJS application.
Basically, react-quill is a wrapper on top of the Quill editor that makes it easy to integrate into a React or NextJS application.
If you are new to NextJS, you can start with this post on getting started with NextJS.
1 – Installing the react-quill package in NextJS Project
First step is to install the react-quill package. Once we have bootstrapped the NextJS project, we can install this package using the below command.
$ npm install react-quillAfter installation, we can check the package.json file of our project. It should look something like below.
{
  "name": "nextjs-demo-app",
  "version": "0.1.0",
  "private": true,
  "scripts": {
    "dev": "next dev",
    "build": "next build",
    "start": "next start",
    "lint": "next lint"
  },
  "dependencies": {
    "next": "12.3.0",
    "react": "18.2.0",
    "react-dom": "18.2.0",
    "react-quill": "^2.0.0"
  },
  "devDependencies": {
    "eslint": "8.23.1",
    "eslint-config-next": "12.3.0"
  }
}
The dependencies section shows that the necessary packages are now installed in our project.
2 – Import React Quill within a NextJS Component
In this step, we can use the React Quill package within a NextJS component.
To include react-quill in a component, we can use NextJS dynamic import feature. This is an advanced feature of NextJS that supports lazy loading of external libraries. This helps improves the initial load performance.
See below snippet on how to use nextjs/dynamic package to import the react-quill package.
const QuillNoSSRWrapper = dynamic(import('react-quill'), {
  ssr: false,
  loading: () => <p>Loading ...</p>,
})
React Quill also supports a bunch of customization options. These options can be set using a special object as below.
const modules = {
  toolbar: [
    [{ header: '1' }, { header: '2' }, { font: [] }],
    [{ size: [] }],
    ['bold', 'italic', 'underline', 'strike', 'blockquote'],
    [
      { list: 'ordered' },
      { list: 'bullet' },
      { indent: '-1' },
      { indent: '+1' },
    ],
    ['link', 'image', 'video'],
    ['clean'],
  ],
  clipboard: {
    // toggle to add extra line breaks when pasting HTML:
    matchVisual: false,
  },
}
As you can see, the above options describe the toolbar available to the users of the Quill editor. Depending on your need, you can customize these options.
3 – Using React Quill Package with NextJS
Below is the complete code for the component where we use the react-quill package.
import dynamic from 'next/dynamic';
import { useState } from 'react';

const QuillNoSSRWrapper = dynamic(import('react-quill'), {
  ssr: false,
  loading: () => <p>Loading ...</p>,
})

const modules = {
  toolbar: [
    [{ header: '1' }, { header: '2' }, { header: '3' }, { font: [] }],
    [{ size: [] }],
    ['bold', 'italic', 'underline', 'strike', 'blockquote'],
    [
      { list: 'ordered' },
      { list: 'bullet' },
      { indent: '-1' },
      { indent: '+1' },
    ],
    ['link', 'image', 'video'],
    ['clean'],
  ],
  clipboard: {
    // toggle to add extra line breaks when pasting HTML:
    matchVisual: false,
  },
}

export default function Home() {
  const [title, setTitle] = useState('');
  const [content, setContent] = useState('');
  const [isDraft, setIsDraft] = useState(true);
  const [isPublished, setIsPublished] = useState(false);

  function submitHandler(event) {
    event.preventDefault();

    const requestObj = {
      id: new Date().toISOString(),
      title: title,
      content: content,
      isDraft: isDraft,
      isPublished: isPublished
    };

    fetch('/api/posts', {
      method: 'POST',
      body: JSON.stringify(requestObj),
      headers: {
        'Content-Type': 'application/json'
      }
    }).then(response => response.json())
      .then((data) => {
        console.log(data)
      });

  }

  function handleTitleChange(event) {
    event.preventDefault();
    setTitle(event.target.value);
  }

  return (
    <form onSubmit={submitHandler}>
      <label htmlFor="title">Title</label>
      <input type="text" value={title} name="title" placeholder="Enter a title" onChange={handleTitleChange} required />
      <QuillNoSSRWrapper modules={modules} onChange={setContent} theme="snow" />
      <button>Save</button>
      <p>{content}</p>
    </form>
  )
}
Basically, we include the QuillNoSSRWrapper component within the template. Also, we set the modules prop of this component to the modules object. Also, we can set the theme property for the editor and provide a handler for onChange.
We wrap the Quill editor within a normal form with other fields such as title of the post and a button to submit the post.
Once the user enters some content in the Quill editor and clicks submit, we create a post object and invoke the API to store the post data. Depending on your requirement, you can modify this section.
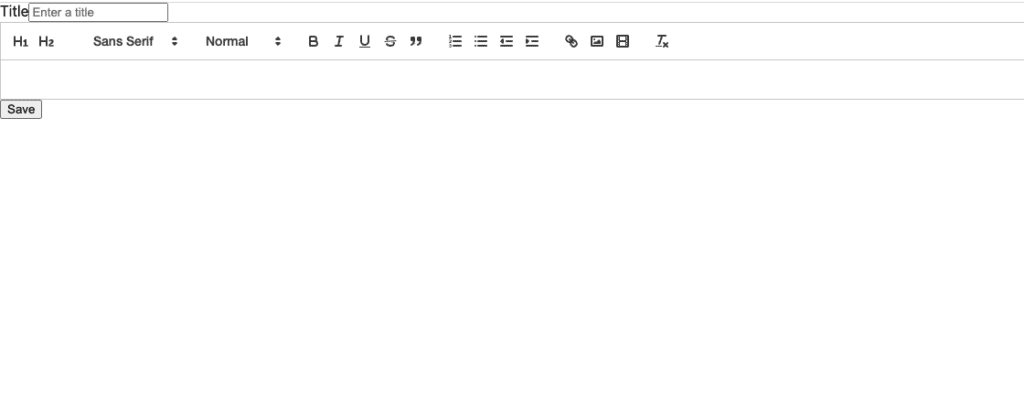
If we run the application now and visit http://localhost:3000, we can see the below layout.

Conclusion
With this, we have successfully learnt how to integrate React Quill with NextJS.
If you have any queries or comments, please feel free to mention them in the comments section below.

0 Comments