Every component in Svelte goes through a lifecycle. A component is created and ultimately destroyed. However, in between these steps, there are other lifecycle events. While designing an application, we often need to tap into specific lifecycle events to perform some action in our program. Svelte Component Lifecycle Methods help us achieve this goal.
Using Component Lifecycle Methods in Svelte, we can execute actions at specific moments of the component lifecycle. These moments can be creation of a component, before and after component update and also the point where the component is destroyed. In addition, Svelte also provides the tick function that we can use anywhere in the code.
In this post, we will look at the lifecycle of a Svelte Component along with specific examples of each method.
1 – Svelte Component Lifecycle Methods
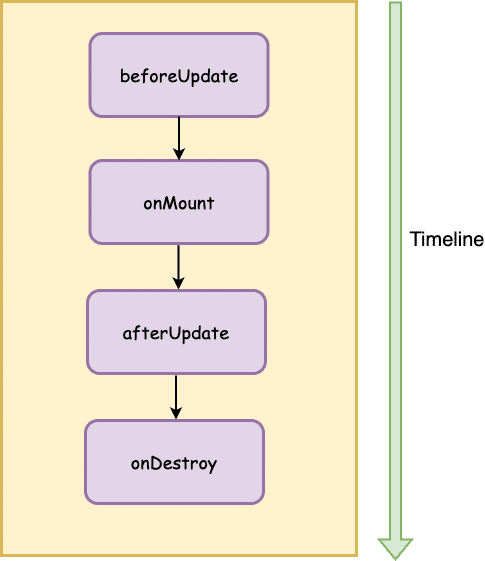
In Svelte, a component goes through four major lifecycle events. Each of these events has a specific functions that allows us to run code at those key moments.
The below illustration shows the component lifecycle methods available in Svelte.

Let’s look at each of these methods one-by-one.
2 – The onMount Lifecycle Method
As the name suggests, onMount() method is called when the component is mounted in the DOM. Incidentally, this is also the most commonly used method.
We can use onMount to fetch external data, initialize variables, setting up subscriptions to Svelte stores and so on.
See below example of its usage:
import { onMount } from 'svelte';

onMount(async () => {
        console.log("I'm called during mounting")
		const res = await fetch(`https://jsonplaceholder.typicode.com/posts/1`);
		let data = await res.json()
        title = data.title
	});
Basically, onMount schedules a callback to run as soon as the component mounts to the DOM. In the above example, we use this method to make a call to an external API using Javascript fetch.
3 – The beforeUpdate Lifecycle Method
The beforeUpdate() method is fired before the DOM is updated.
See below example of its usage:
import { beforeUpdate } from 'svelte';

beforeUpdate(() => {
        console.log("I'm called before the title is updated")
    })
Similar to onMount(), this function also schedules a callback to run just before the component updates.
We can use beforeUpdate() to perform actions such as whether we need to auto-scroll after a particular DOM update. This function allows us to hook into the point of time just before the update happens and take some action.
4 – The afterUpdate Lifecycle Method
The afterUpdate() method is opposite of beforeUpdate(). It executes after the DOM update is complete.
See below usage example:
import { afterUpdate } from 'svelte';

afterUpdate(() => {
        console.log("I'm called after the title updated")
    })
When afterUpdate() executes, the DOM is in sync with the data update. We can use it to take some action such as informing the user.
5 – The onDestroy Lifecycle Method
As the name suggests, the onDestroy() method executes after the component is destroyed.
See below usage example:
import { onDestroy } from 'svelte';

onDestroy(async () => {
        console.log("I'm being destroyed");
    })
The basic use of onDestroy method is to release any resources, clear any timers or unsubscribe from Svelte stores. Clean up is necessary. Not doing so can cause memory leaks within the application.
The onDestroy() method provides the last change to perform such activities.
6 – The Svelte Lifecycle Method Order
When we load a component containing the various lifecycle methods, below is the order in which they execute.
About.svelte 14 I'm called before the title is updated
About.svelte:7 I'm called during mounting
About.svelte:18 I'm called after the title updated
About.svelte:14 I'm called before the title is updated
About.svelte:18 I'm called after the title updated
About.svelte:22 I'm being destroyed
As you can see, this matches with the illustration from the first section. The first method to execute is beforeUpdate(). Next is onMount(). Svelte follows it up with afterUpdate(). The onDestroy() is the last to execute.
7 – The Special Svelte Tick Method
The tick() method is a special lifecycle method. It is different since we can call it any time and not just when the component initializes.
In Svelte, the DOM does not update immediately when something changes. To improve efficiency, Svelte batches the changes together by waiting until the next micro task. In other words, when we update something in our application, there is a brief moment when the update is not present on the DOM.
See below example:
<script>
    import { tick } from 'svelte';

    let count = 1;
    $: double = count * 2
    async function increment() {
        count++;
        //await tick()
        console.log(double)
    }

</script>

<div>
    <button on:click={increment}>Increment</button>
</div>
When we click the Increment button, the console log prints 2 even though variable double should have the value 4 after execution of count++ due to reactive update in Svelte. However, Svelte has not immediately refreshed the values.
In case we want to make sure that we perform something after the update is done (in this case printing to the console), we can call tick() method. See below:
<script>
    let count = 1;
    $: double = count * 2
    async function increment() {
        count++;
        await tick()
        console.log(double)
    }

</script>

<div>
    <button on:click={increment}>Increment</button>
</div>
In this case, we call await tick() after count++. This makes the execution wait until pending stage changes are resolved. Once the changes are done, the console log prints the value of variable double as 4.
Conclusion
This covers the basics of Svelte Component Lifecycle Methods. These are quite handy methods for building applications and managing components in a more effective way.
If you have any comments or queries about this post, please feel free to mention them in the comments section below.
0 Comments